Above Ground Oval Installation
The Special Needs Of Oval Pools
What makes these pools different than round pools? It's all in the side braces. The side structures that can add hours or days to the installation time.
Every make and model of above ground pools have a different set up for their side braces. It would be impossible to cover them all here. There are some things common to them all, some basic steps you should take with all oval pools.

Leveling the ground is the first step. I will discuss leveling in more detail a little later. For now just keep in mind the entire pool area needs to be perfectly level. It is a good idea to add a couple of feet extra all around the pool and level that too. The only difference at this point between a round pool and an oval pool is when to pack the ground and do the final smoothing.
Since setting the side braces on an oval pool can involve a lot of digging you may want to hold off on the ground packing until the trenches are dug and the braces set. The final smoothing can wait also because setting the braces will disturb most of the ground anyway. So just level the ground and get right to the hard part, setting the side braces.
Above Ground Oval Side Braces
Oval pools are constructed in two basic ways. There are ones without connecting straps allowing for a deep area to be dug. The second design has steel straps that connect the braces from side to side. Pools with straps are for flat bottom installations only. There are the space saver, or profile pools and pools with the angle supports. Both types can be either with or without straps. If you are buy an oval pool with the angle supports make sure you have the extra space these require.
Oval pools with straps are generally much easier to install than those without. The straps hold all of the outward pressure in an easy to install fashion. Without the straps pool designers have gone nuts inventing ways to deal with the pressure. In my opinion Doughboy had it right 30 years ago and they use the same basic setup today. Other makers have invented brace setups that are a nightmare to install. Pools with straps usually involve less digging and having something to connect the two sides together which takes away a lot of the guess work.
It is extremely important when you assemble your braces to follow the instructions closely. Some setups will have a million nuts and bolts of different sizes. They all have a special purpose so take your time and get them where they belong.
Above Ground Oval Installation With Straps
When working with straps I will lay the entire brace system out and connect the two sides with the straps. I will even use the bottom rails, between the side braces, at this initial stage. Some oval pools have pressure plates that connect together down the side of the pool. These should be connected also.
It is very important at this point to get the entire brace framework square. I use a string line down one side of the pool, just inside the braces. Set two stakes a few feet past the end braces and connect them with a string. All of the braces on one side should now be set about a quarter inch away from the string. Now you can take a tape measure from the outside brace on one side to the opposite outside brace on the other side. Now do the opposite corners and adjust the brace assembly side to side until both of these measurements are the same.
With the framework square the braces can now be set. Many pools require trenches for the braces to sit into. This will probably mean taking some of the pool back apart. Carefully mark where each trench needs to be before moving anything. You will probably need to disconnect the straps and pressure plates in order to move the braces aside to dig the trenches.
Carefully level your trenches front and back before putting the brace assemblies into place. Most pools will call for a block in the back of the trench. This is very important. It is also important that all of the blocks are set at the exact same level.
Oval Pressure Plates

The bottom rails are similar to the pressure plates. Some of them need to be installed as you are setting the braces and some can easily be attached after they are all set. When locating the bottom rails for the sides of your oval be be sure you have the right ones. Oval pool bottom rails will usually come in three sizes. They will be the end rails, the transition rails and the side rails. Some rails are color coded with paint while others have numbers either stamped or painted on them. Separate all of these rails before using any of them.
More Oval Installations
These photos show a Doughboy brand oval pool being installed.
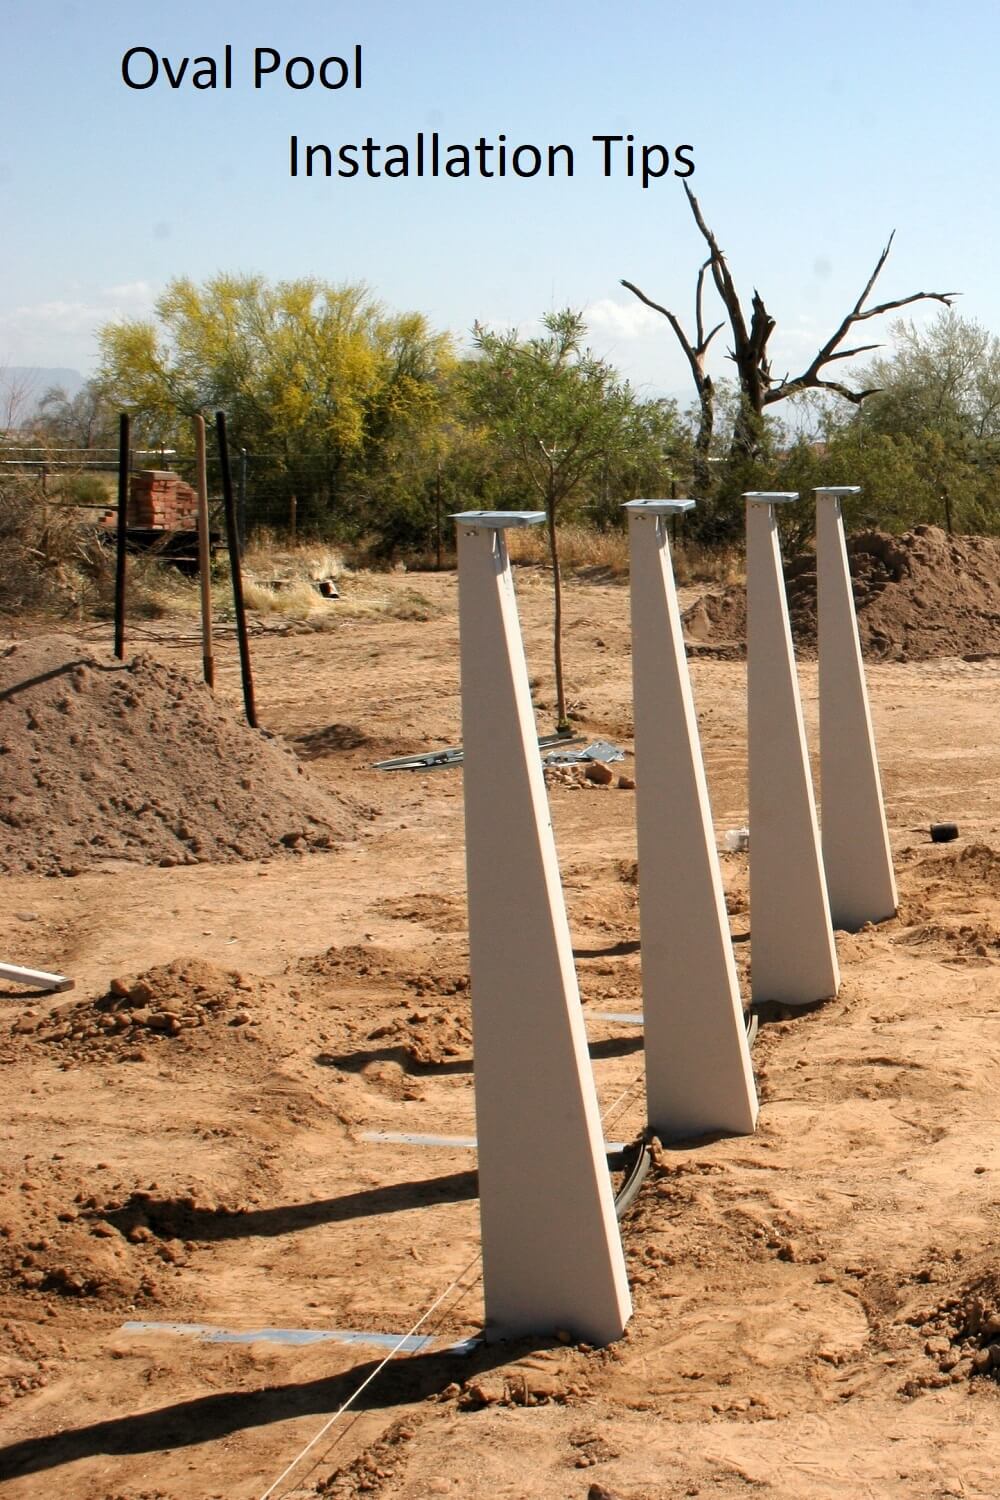
We are working today in Phoenix Arizona. The start of this job was removing a very old pool the same size as the new 16' x 24' we are working on. The side braces need to be set in the ground deep enough so that the bottom rails rest at ground level. The back needs to be deep enough for a concrete block to sit against the L bracket attached to the bottom of the brace channel. My string line is in place so I know exactly where to set the braces.

On this size size Doughboy pool there are two braces on each side and 4' apart, center to center. Here I am using my laser level and checking the brace front, center and rear. I want it perfect. When choosing that perfect number to use keep in mind the place where the bottom rail will sit. It may take several tries to get the block set right and the trench perfect. This is where it is worth the extra time it takes to get it right.

This photo shows the bottom rail bracket and how high it is located. It's about 3 1/2" from the bottom of the channel. That's how deep the trench needs to be. I will concentrate on one side only, up against my string line, until I am happy with it and then the trenches get filled in and packed.

The Bottom rails need to be installed as the braces are being set. This allows you to make sure the rail will sit at ground level and it also assures you your distance apart is correct. With the distance set at the rear of the channel with the bottom rail I go to the front and make sure the channel is an equal distance apart, in this case 4'. At this point there should be an equal tiny space between the braces and the string line in all places. Also be sure you are using the correct bottom rails as there will be three sizes, two for the sides, four for the corners and the rest for the round ends. Doughboy stamps them on the inside of the rails. Before we move to the next photo there are those pressure plates that need installed. If you go back to the first photo on this page you will see the area between each brace needs dug out flat and level with the tops of the brace channels. The plates are then laid out and covered with dirt.

With all the braces set and the straps in place it is time to make the base as smooth and level as possible. Back to those straps, I add my own. I use a Simpson Strong-Tie strap found on Amazon or Home Depot. With the braces set I use self tapping screws and attach the straps. I do because I prefer not using concrete around the backs of the braces, It saves time and money and I feel better knowing the braces will not push out. With a deep end installation I have to use concrete instead of straps. Note also that every end footplate has been laser leveled and there ore no highs or lows in the bottom rails.

Notice where we put the sand, down the center of the pool, no where near the bottom rails. I want a flat area to unroll the wall and I don't want any sand getting in the bottom rails. The sand gets spread only when the pool wall is up and the frame work built. With all the uprights and top rails in place I can eyeball down both sides to see that they are straight. There should be a straight line for three sections, the side and the two transitions.

With the pool up and everything looking good, level everywhere and straight sides it's time to spread the sand. With that done we do some foot stamping and start the smoothing process.

My way of smoothing the sand is starting with the back side of a large rake, with that done I switch to a large push broom for the perfect finish. When I am done and out of the pool I know no one will get back in it until the pool is full and the sand has had a chance to really pack. Everything else we do will be done from outside the pool.

We have the liner in the pool and the water filling. It gets let down a little at a time until the water is near the edge and then the water get shut off until the next step is completed.

Setting the liner in place around the top involves a few steps. The top rails come off a few at a time, The liner gets pulled up snug and the excess folded inside the pool with an even 2" overhang on the outside. The coping gets installed and the metal retaining rods installed. Only after the rods are in place and the caps over them in place is wall wall secure from blowing over I it is time to move on to a few more sections.

We are working with an overlap liner as apposed the different bead types. I prefer working with these liners but we do all the different ones. With the liner set in place, the rods and top plates on, the top rails get installed. Normally I have a helper or two to finish the pool assembly while I am installing the skimmer and return and finishing the filter hook up.

This is the finished pool. Another work day done and another happy customer. And thanks to my youngest daughter for coming along and taking these photos.

We do pool and liner installations all over the state of Arizona. Check Above Ground Pool Installations for prices.
Below are some more of my illustrated installation pages with plenty of help and advice.
Hire The Pool Pro
Contact For Installation Quote
Would you prefer to share this page with others by linking to it?